Quickstart
Last updated 23 October 2026
NOTE: Throughout this quickstart, keys are specified for Linux and Windows. On MacOS, press ⌘ instead of Ctrl.
Setup
Sidecut uses FFmpeg to work with media files. If it can't find FFmpeg, Sidecut will show you the best install command for your system. Run the command, and then press Check again.
The workspace
Sidecut's workflow is a bit unconventional. Instead of having a single rigid or tiled workspace layout, Sidecut projects have a set of desktop-like workspaces. This allows you to organize your project windows, panels and items freely within each workspace, and tailor your layout per scene. By default, moving windows around will snap them to an invisible grid, but you can turn it off and on again by using the G key.
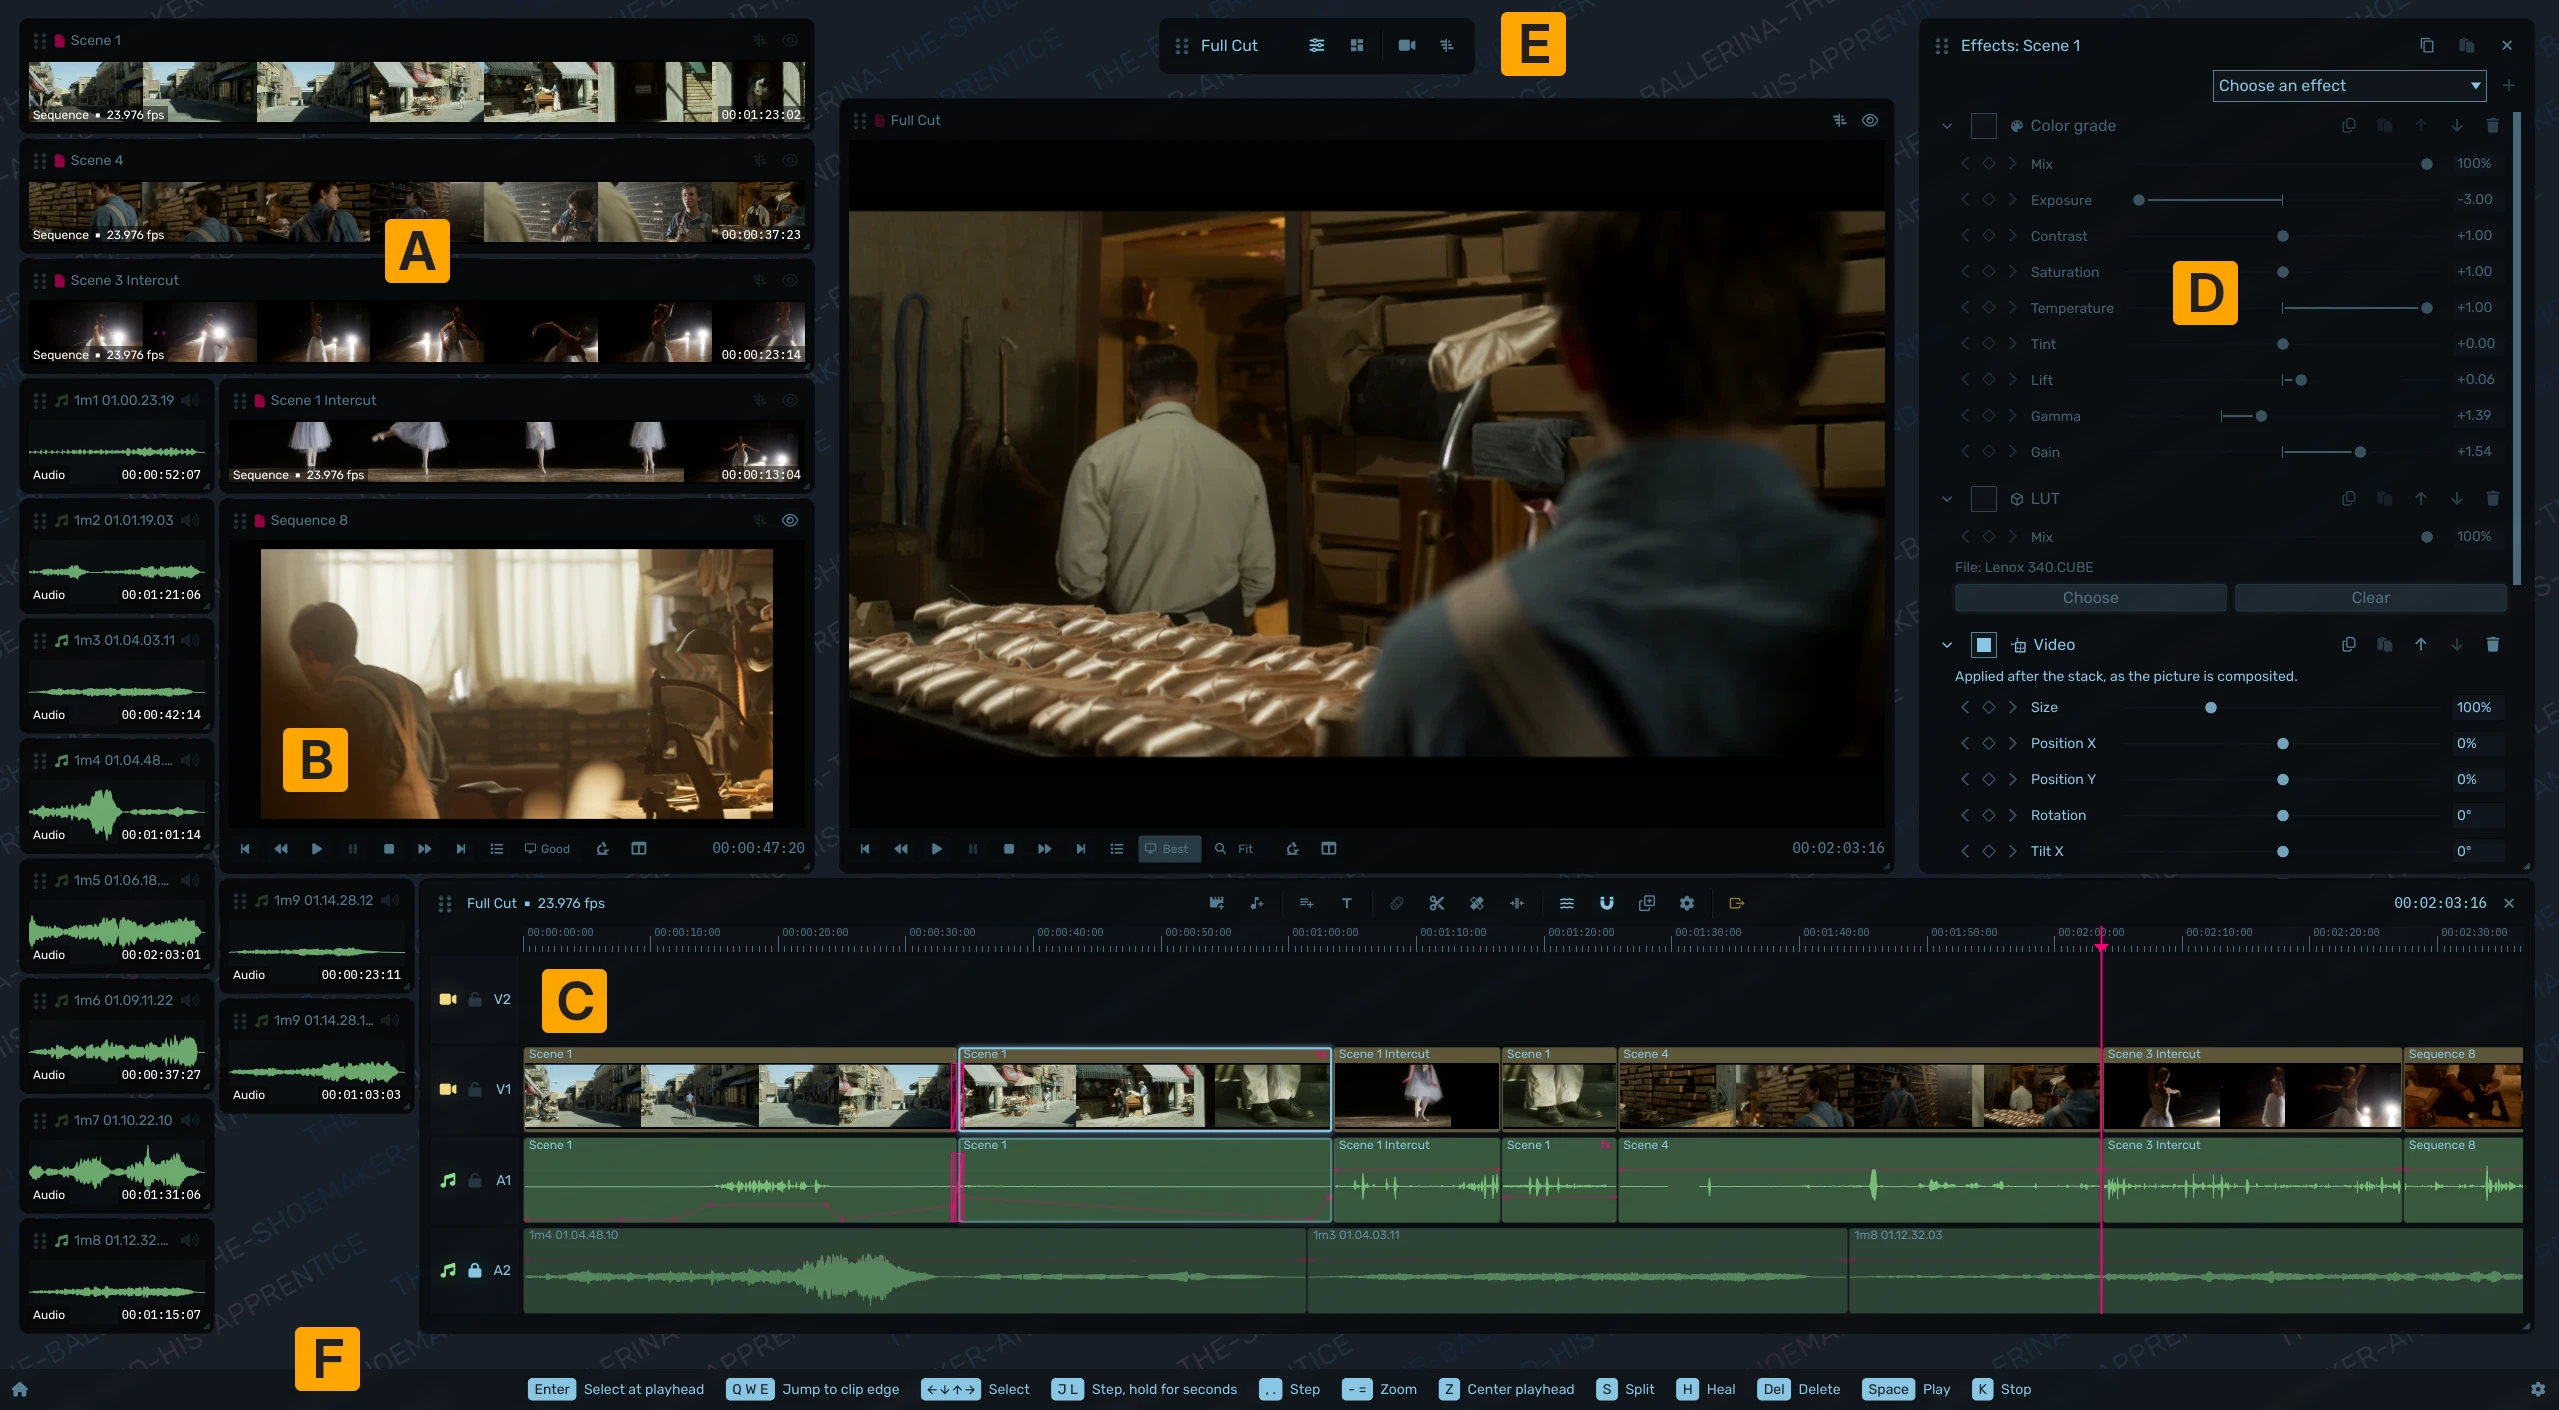
- Bin clips and media items.
- A bin item viewer.
- Sequence timeline. You can open several per workspace.
- Workspace inspector - lets you tweak effects and transitions, or view a file's details.
- The workspace label (double-click to rename it) and tools panel.
- The status bar with keyboard hints. Hold Ctrl, Shift or Alt to see their respective hints.
You can use PgUp and PgDn to switch between workspaces. PgDn on the last workspace creates a new one.
Panel controls
Viewers let you zoom with the mouse wheel, pan by dragging and fit the picture again with a double-click. To close a viewer, point at it and press Esc.
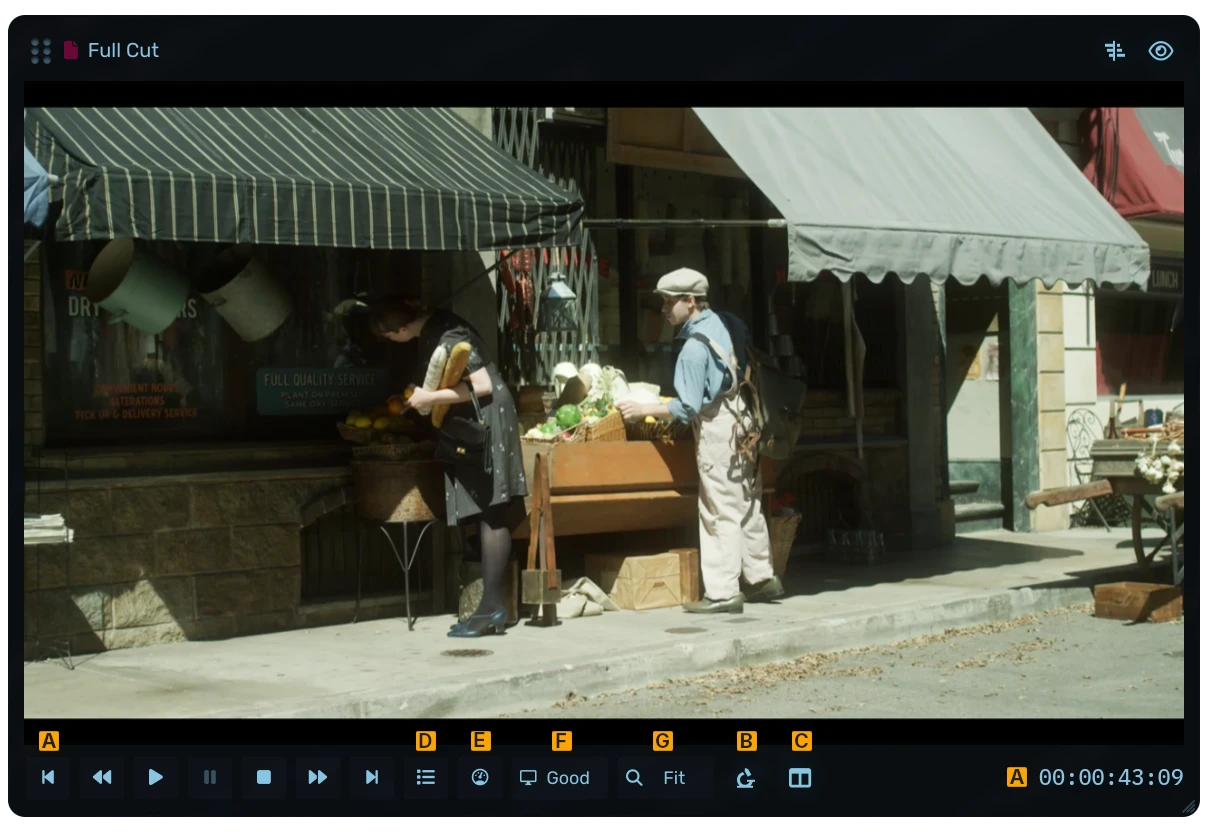
- Transport controls and timecode.
- Full-size frames while paused.
- Two-up view, showing both sides of a cut while you trim it.
- File bookmarks.
- Video scopes - a luma waveform, an RGB parade or a vectorscope (Ctrl+Shift+W).
- Playback resolution. Click to cycle it.
- Zoom level. Click to cycle it.
You can also peek at a file without opening its viewer. Hold ` over its closed panel and move the pointer to scrub. Over a timeline clip, the same key peeks at the clip's whole source.
The timeline's toolbar runs along its title. Hovering over a button shows its keybinding in the tooltip.
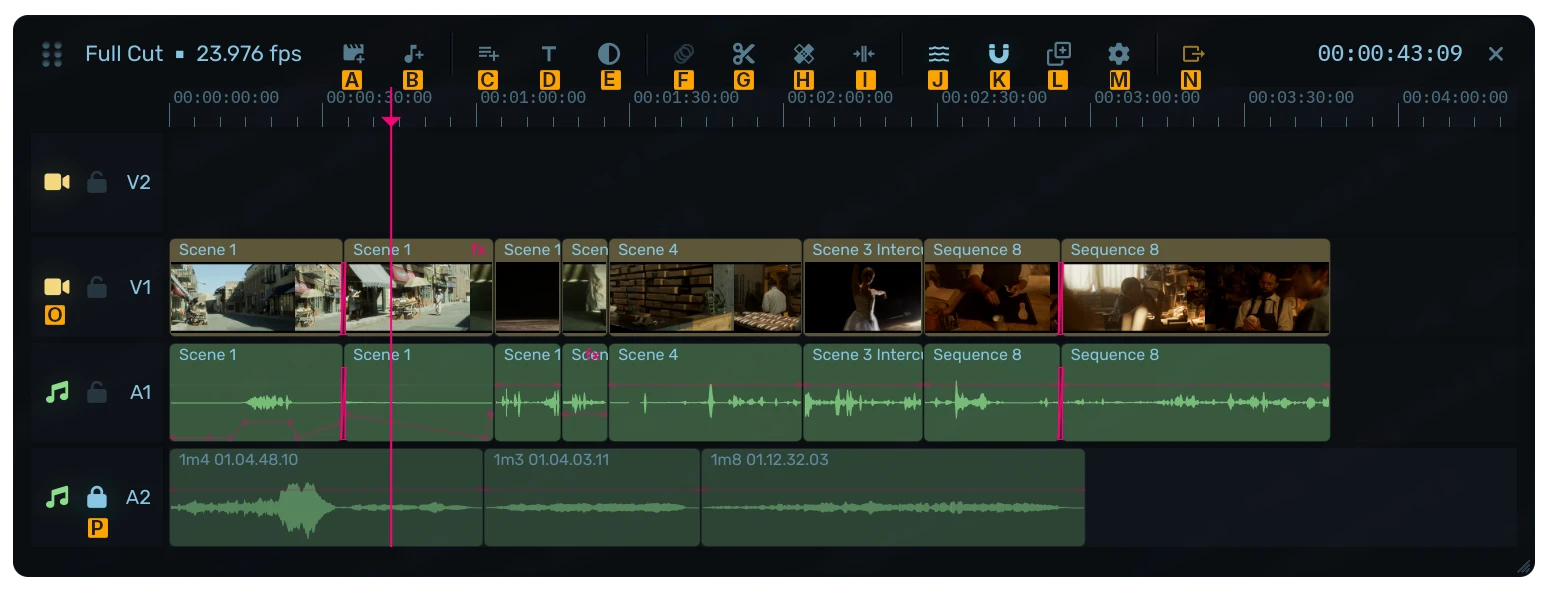
- Add a video track.
- Add an audio track.
- Insert a clip at the playhead.
- Add a title.
- Add an adjustment clip.
- Add a dissolve, or remove the selected transition.
- Split at the playhead.
- Heal split clips.
- Close a gap.
- Ripple on and off.
- Snapping on and off.
- Duplicate the sequence.
- Sequence settings.
- Export to file.
- Show or hide the track (mute or unmute, for audio).
- Lock the track.
To remove a track, hold Ctrl over the track headers and click the button that shows up.
The inspector lists the selected clip's effects in the order they apply. Dragging an animated row's slider adds a keyframe at the playhead.
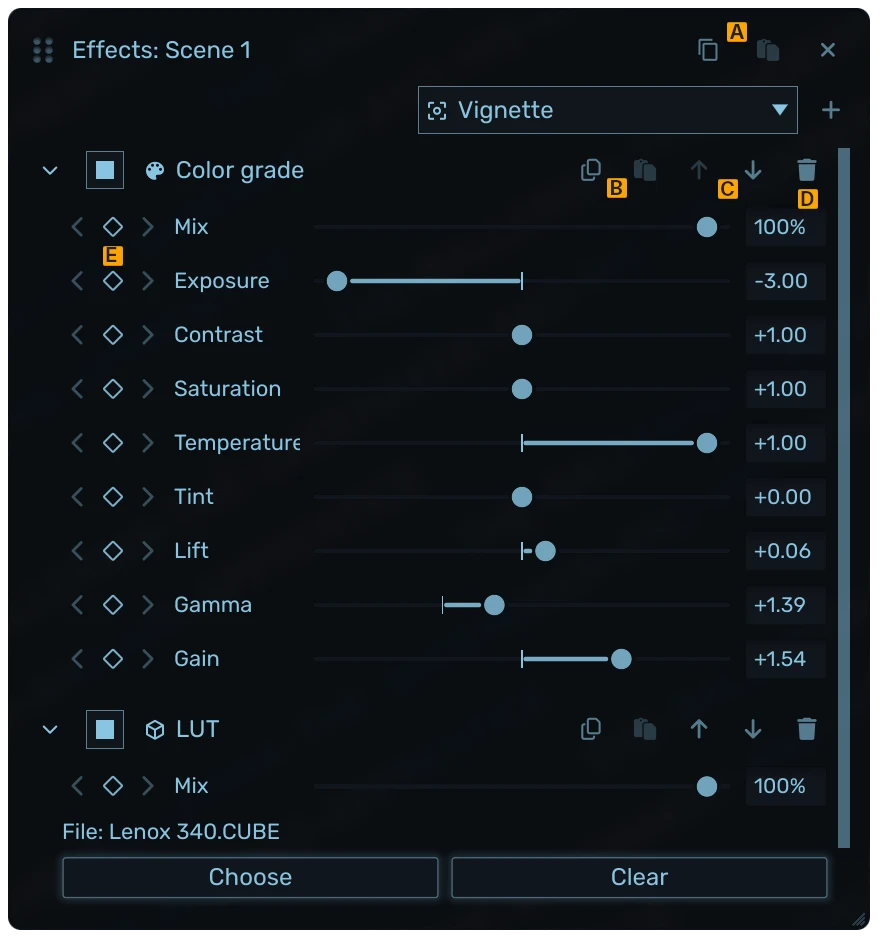
- Copy or paste all of the clip's effects.
- Copy or paste a single effect.
- Move an effect up or down the stack.
- Remove an effect.
- Keyframe controls. The arrows jump between keyframes and ◇ adds one at the playhead. Click ◆ to remove a keyframe, or Alt-click it to ease it (●).
Color grade has a wheel for each of Lift, Gamma, Gain and Offset. Drag the puck to tint, hold Shift for finer control and double-click to reset. The LUT effect accepts 3D and 1D .cube files, and you can press Reload after editing one.
Selecting a transition will show its settings in the inspector. You can change the transition or use Custom GLSL to apply shaders from gl-transitions.com. Before cut and After cut set how far the transition reaches on each side. Transitions on audio tracks are always crossfades.
Editing with Sidecut
Like many other editing tools, Sidecut can use in/out marks to help with placing clips inside a sequence. Mark in and out points in a viewer with I and O, then drag the item onto a track to place only that span. Dropping a clip overwrites whatever it covers.
To help with longer bin items, Sidecut has a bookmarking tool. Use M to add a bookmark at the playhead of the viewer. Bookmarks belong to the source file, and each viewer can list its file's bookmarks. You can also drag bookmarks directly onto a sequence track.
Pressing Insert (F9 on MacOS) lets you pick a clip or a bookmark and insert it at the playhead. Everything after it moves along, on every track.
Sidecut has ripple on by default, so trimming an edge or pressing [ and ] pushes whatever follows. You can turn it off and on with R, or hold Alt to trim one side only.
Trimming is done by dragging a clip's edge, or using [ and ] to trim single frames. If neither clip is selected, dragging a cut rolls it. Shift+[ and Shift+] slip a clip's content by a frame.
Linked clips - a video clip and its audio move and trim together. P links or unlinks them, and holding Alt as you click acts on one clip alone.
Adjustment clips - Ctrl+Shift+A adds a clip with no media. Effects on an adjustment clip apply to everything on the tracks below it, and a dissolve onto one fades the look in.
Snapping - N turns it off and on. Clips snap to each other's edges and to the playhead.
Your first edit
- Press Ctrl+I and add a few clips. Each one gets a bin panel.
- Press Ctrl+T for a new sequence, then open its timeline from the bin.
- Open a clip's viewer, mark a span with I and O and drag the panel onto the timeline.
- Move the playhead, press Insert and pick a second clip.
- Trim the cut between them with [ and ], or drag it.
- Select a clip you don't want and press Shift+Delete. The gap closes behind it.
- Double-click the cut between the clips for a dissolve. Click the dissolve to change its type and length in the inspector.
- Press Ctrl+Shift+T for a title, and type its text in the inspector.
- Drag an audio clip's gain line to set its level. Double-click the line to add a point, and use the handles at the clip's top corners to fade it in and out.
- Press Export to file on the toolbar.
On MacOS, the delete key deletes a clip and ⇧⌫ ripple-deletes it.
Exporting
You can use Sequence settings to set the resolution, frame rate, codec, bit depth and quality. Sidecut offers export parameters by inspecting the capabilities of your installed FFmpeg.
Export to file writes an .mp4 (or a .mov for ProRes) into your Exports folder, named by date and time. You can keep editing while the export runs and follow its progress on the workspace panel. Exports are in Rec. 709, and HDR footage (like an iPhone's) is converted as it's read.
Unregistered copies export up to 1080p, with a small 'Unregistered copy' watermark. Buy a license at sidecut.app/buy to lift both, then paste it into Register. You'll find Register on the splash screen, in the sequence settings and in Settings' License tab.
Settings
F10 (⌘, on MacOS) opens Settings. Use the Shortcuts tab to view or rebind any key, and the System tab to choose where Sidecut keeps media, projects, exports and its cache.
Keyboard cheatsheet
These are the default keys. On MacOS, keys marked Ctrl use ⌘, and PgUp, PgDn, Home and End are Fn with an arrow key.
Project & windows
| Action | Linux & Windows | Mac |
|---|---|---|
| Add media | Ctrl+I | ⌘I |
| Add sequence | Ctrl+T | ⌘T |
| Duplicate sequence | Ctrl+Shift+D | ⇧⌘D |
| Previous workspace | PgUp | PgUp |
| Next workspace | PgDn | PgDn |
| Move workspace earlier | Shift+PgUp | ⇧PgUp |
| Move workspace later | Shift+PgDn | ⇧PgDn |
| Next window | Ctrl+Tab | ⌃Tab |
| Previous window | Ctrl+Shift+Tab | ⌃⇧Tab |
| Undo | Ctrl+Z | ⌘Z |
| Redo | Ctrl+Shift+Z or Ctrl+Y | ⇧⌘Z or ⌘Y |
| Snap windows to the grid | G | G |
| Close viewer | Esc | Esc |
| Settings | F10 or Ctrl+, | ⌘, or F10 |
Playback & navigation
| Action | Linux & Windows | Mac |
|---|---|---|
| Play or pause | Space | Space |
| Stop | K | K |
| Step back a frame | , | , |
| Step forward a frame | . | . |
| Step back a second | Shift+, | ⇧, |
| Step forward a second | Shift+. | ⇧. |
| Jog back | J | J |
| Jog forward | L | L |
| Previous edge | Ctrl+← | ⌘← |
| Next edge | Ctrl+→ | ⌘→ |
| Go to start | Home | Home |
| Go to end | End | End |
| Go to in | Shift+I | ⇧I |
| Go to out | Shift+O | ⇧O |
| Next clip start | W | W |
| Next clip end | E | E |
| Previous clip start | Q | Q |
Marking
| Action | Linux & Windows | Mac |
|---|---|---|
| Mark in | I | I |
| Mark out | O | O |
| Add bookmark | M | M |
Selection
| Action | Linux & Windows | Mac |
|---|---|---|
| Select left | ← | ← |
| Select down | ↓ | ↓ |
| Select up | ↑ | ↑ |
| Select right | → | → |
| Select at playhead | Enter | Enter |
| Select all at playhead | Shift+Enter | ⇧Enter |
Editing
| Action | Linux & Windows | Mac |
|---|---|---|
| Insert clip at playhead | Ins | F9 |
| Cut | Ctrl+X | ⌘X |
| Copy | Ctrl+C | ⌘C |
| Paste | Ctrl+V | ⌘V |
| Paste effects | Alt+V | ⌥V |
| Move clip left | Shift+← | ⇧← |
| Move clip right | Shift+→ | ⇧→ |
| Split at playhead | S | S |
| Heal split clips | H | H |
| Delete | Del | ⌫ |
| Delete, this clip only | Alt+Del | ⌥⌫ |
| Ripple delete | Shift+Del | ⇧⌫ |
| Close gap | Backspace | ⌦ |
| Snapping on/off | N | N |
| Ripple on/off | R | R |
| Add title | Ctrl+Shift+T | ⇧⌘T |
| Add adjustment clip | Ctrl+Shift+A | ⇧⌘A |
| Toggle transition | T | T |
| Link or unlink pair | P | P |
Trimming
| Action | Linux & Windows | Mac |
|---|---|---|
| Trim or roll a frame left | [ | [ |
| Trim or roll a frame right | ] | ] |
| Trim a frame left, this side only | Alt+[ | ⌥[ |
| Trim a frame right, this side only | Alt+] | ⌥] |
| Slip a frame left | Shift+[ | ⇧[ |
| Slip a frame right | Shift+] | ⇧] |
Timeline view
| Action | Linux & Windows | Mac |
|---|---|---|
| Scopes on/off | Ctrl+Shift+W | ⇧⌘W |
| Zoom in | = | = |
| Zoom out | - | - |
| Zoom to fit | Shift+Z | ⇧Z |
| Center playhead | Z | Z |
Mouse
| Gesture | Where | What it does |
|---|---|---|
| Drag on empty space | Timeline | Selects the clips in the box |
| Shift-click | Timeline | Adds a clip to the selection, or takes it out |
| Click the ruler | Timeline | Moves the playhead |
| Mouse wheel | Timeline | Scrolls |
| Alt + wheel | Timeline | Zooms around the pointer |
| Ctrl + wheel | Timeline | Zooms around the playhead |
| Double-click a cut | Timeline | Adds a dissolve |
| Alt as you press | Timeline | Acts on one clip, not its linked twin |
| ` over the picture | Viewer | Scrubs |
| Double-click the picture | Viewer | Fits the picture |
| Hold ` | Closed panel | Peeks at the file |
| Shift-click | Bin panel | Selects the panel |
Uninstalling
Removing Sidecut takes one step:
- Linux - delete the
.AppImagefile. - macOS - drag Sidecut from Applications to the Trash.
- Windows - right-click Sidecut in the Start menu and choose Uninstall. Windows deletes its settings and cache with it.
On Linux and macOS, Sidecut's settings and cache stay behind in two folders, which you can delete too:
| Settings | Cache | |
|---|---|---|
| Linux | ~/.config/sidecut | ~/.cache/sidecut |
| macOS | ~/Library/Application Support/sidecut | ~/Library/Caches/sidecut |
The settings folder holds your license key, so keep a copy of the key before deleting it. Your projects and exports stay where they are, in Documents/sidecut and Videos/sidecut. If you moved the cache, projects or exports in Settings' System tab, they're where you put them.